Drawing Time-lapse Videos
Red Fox by Ray Cassel from Raymond Cassel on Vimeo.
Misty Landscape by Ray Cassel from Raymond Cassel on Vimeo.
iPad Illustration Demo
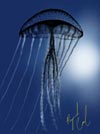
This is how I sketched this illustration of a jelly fish in silhouette. I was intrigued by this view of the jelly fish because you get a real sense of the shapes and structures that make up such an alien creature. I like the color and contrast in this piece as well.
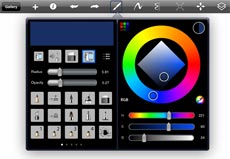
I used Sketchbook Pro by Autodesk. This demo should translate to most art apps with a comparable tool set. First create a new drawing. In this case click the plus icon to create a new sketch. On my app a new sketch defaults with a white background. Let's first change the background color. I selected a dark blue with an RGB value of 24, 47, 99. I then selected the paint bucket tool. Click anywhere on the screen. This will apply the color to the whole page.
To simulate the sun filtering through the water I selected a lighter blue color. I used the airbrush tool. I used the slider to make the brush as large as it can be. I then used the airbrush to create a lighter region in the back ground. Next I use a color that is nearly white to add in a hotspot.
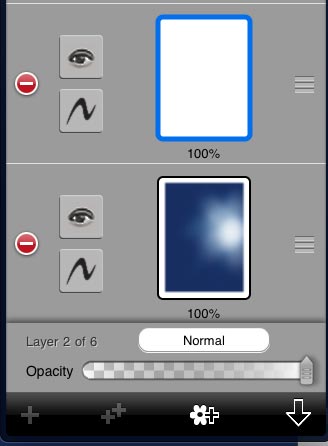
Navigate to your menu in your drawing app and click on the layers button. Create a new layer. I like roughly draw in my shapes. I use a fine point pencil to sketch in my shapes. I will also use this layer to draw in guidelines.
Now I create another layer between my background and my sketch layer.  Here I will put in my dark tones. Since transparent objects have defined edges, I wanted a nice crisp edge for the top of the bell of the jellyfish. I used the marker tool to create this arc. The outer edge of the jellyfish is crisp but the inner edge needs to fade. I adjust my eraser tool to have a wide soft edge. The edge is softened by adjusting the opacity down. This may require some trial and error. If it's not quite right, undo, refine your settings and try again. To further define the shape of the bell I now add some texture. Using the paint brush tool I tapped in dots on the top of the bell. Concentrating more on the upper surface and less as you see through the side. I varied the opacity and the size of the dots to give a more organic and non-uniform feel.
With the bell defined, we can add in the other dark details. Using a "Paint Brush with about 50% opacity I drew in center tentacles. I lowered the opacity and began drawing the outer tentacles. Only a few tentacles, the other tentacles catch the light and will be drawn in my highlight layer. With a lower opacity and a brush that mimics ink bleeding into paper, I go back over the tentacle shapes with this "watercolor" brush. This will soften the edges and create a delicate texture. I finish off the dark layer by airbrushing the underside of the bell. I added darker areas where the tenticles meet the underside of the bell.
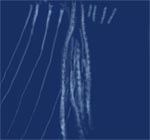
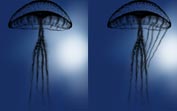
The dark areas in place now I create a new layer for the highlights. Using an equivalent of 50% opacity and white with the paintbrush tool, I drew in the tentacles on the other side of the jellyfish. I lowered the opacity and increased the size of the brush to thicken the tentacles as connects to the bell. Using the same "watercolor" brush I paint in the soft structures that catch the light on the edges. The image on the right shows all layers turned off except the white areas. With the airbrush I put in some subtle highlights in the bell to finish it.
This drawing took me about forty minutes from start to finish. I was very pleased with the result.